 So, finally, we have Android Market on our emulators. Now, since it is possible, a developer can create any number of emulators with the android market on it, and login to different google accounts, and try to increase his app's ratings.
This is actually too dangerous. Google doesn't discriminate requests from market apps on such emulators, and still accepts ratings and reviews. I don't know how Google can now stop this, since, everybody and anybody can now have access to the market place from his emulator.
But, I am happy, :)
Till Google takes any steps to curb this backdoor entry through the emulators, we can obviously expect some of those comments/reviews on the apps to be just spam. :(
Google market has got to do something to stop this, and probably they will.
So, finally, we have Android Market on our emulators. Now, since it is possible, a developer can create any number of emulators with the android market on it, and login to different google accounts, and try to increase his app's ratings.
This is actually too dangerous. Google doesn't discriminate requests from market apps on such emulators, and still accepts ratings and reviews. I don't know how Google can now stop this, since, everybody and anybody can now have access to the market place from his emulator.
But, I am happy, :)
Till Google takes any steps to curb this backdoor entry through the emulators, we can obviously expect some of those comments/reviews on the apps to be just spam. :(
Google market has got to do something to stop this, and probably they will.
Friday, November 6, 2009
Market on Emulator
So, finally, we have Android Market on our emulators. Now, since it is possible, a developer can create any number of emulators with the android market on it, and login to different google accounts, and try to increase his app's ratings.
This is actually too dangerous. Google doesn't discriminate requests from market apps on such emulators, and still accepts ratings and reviews. I don't know how Google can now stop this, since, everybody and anybody can now have access to the market place from his emulator.
But, I am happy, :)
Till Google takes any steps to curb this backdoor entry through the emulators, we can obviously expect some of those comments/reviews on the apps to be just spam. :(
Google market has got to do something to stop this, and probably they will.
Thursday, November 5, 2009
Android Market on Emulator
 Wow, This is cool. Finally, I am able to run the Android Market on the emulator. And also, see all the paid apps and copy-protected app, right here on my emulator.
What do you need?
Well, the basic SDK. 1.5, 1.6 or 1.1
And then, go to the HTC website where you can find the images/recovery images. Download the version (system image only) which you want to run.
http://developer.htc.com/google-io-device.html#s3
(Download the System Image zip)
Extract the files of this zip. There's a system.img file which you will need in the next steps.
Create an AVD (1.1, 1.5 or 1.6) depending on your requirements.
Copy this system.img file into the avd directory. For example, if you created an avd named "MyPhone", go to .avd\MyPhone\ and paste this system.img file here.
Now start the emulator. Voila, You are ready to go. After you sign in with a google account, your phone is ready to use. You now have access to all the market apps right from your emulator.
Note: If you are not able to run it successfully, and if you are getting Network communication error, please download the AVD that I have created from this link.
Link for 1.5 image
www.4shared.com/file/147420185/da5381e1/avd.html
Link for 1.6 image
http://www.4shared.com/file/165624746/fc72c3ed/system.html
Friday, October 30, 2009
Blogaway 1.0 for Android Phones

 A simple blogger client to read, post and manage your blogspot account feeds. A convenient way to keep you connected. This initial version is still under active development.
More and more features will get added so that you can have a real Blogging experience.
Features for 1.0
- Multiple blog account support
- Multiple feeds under one account
- Create, publish or save as drafts
- Blogroll to read public Blogspot feeds
- Captcha unlock account
- Set default account to create new post, comments etc.
Future improvements
- View Comments
- Post Comments
- Add pictures/videos to posts
- Manage your accounts
- Delete feeds and accounts
- Support for other blog feeds other than Blogspot
I will be updating this application at regular intervals with more features.
Currently, adding tags to your posts is not supported. I suppose this feature is one of the most important feature for such a client.
A simple blogger client to read, post and manage your blogspot account feeds. A convenient way to keep you connected. This initial version is still under active development.
More and more features will get added so that you can have a real Blogging experience.
Features for 1.0
- Multiple blog account support
- Multiple feeds under one account
- Create, publish or save as drafts
- Blogroll to read public Blogspot feeds
- Captcha unlock account
- Set default account to create new post, comments etc.
Future improvements
- View Comments
- Post Comments
- Add pictures/videos to posts
- Manage your accounts
- Delete feeds and accounts
- Support for other blog feeds other than Blogspot
I will be updating this application at regular intervals with more features.
Currently, adding tags to your posts is not supported. I suppose this feature is one of the most important feature for such a client.
Wednesday, October 28, 2009
Android 2.0 !! Overview
Here is a list of apps that have been removed from the emulator.
1. Calendar
2. Camcorder
3. Google Maps
The icons now have a new look and feel. Though I like the Donut icons, I guess, icons will keep changing.
One issue with the default-email client that is supposed to support Exchange.
I have successfully added an exchange account. But I am not able to see any new mails, and also, the mails I sent are still in the Outbox.
When I go to contacts to add contacts from my Exchange Account, the application crashed. I couldn't test if the Contact's application can really synchronize with the exchange server.
As for Google Maps, I think it will be shipped with the handsets only, as a separate application, and your code that uses Google Maps features will work on handsets, but as of now, there is no way to test such applications, unless you get it installed on your emulator.
A lot of animated transitions when you switch between screens. And the new "Unlock" feature to unlock the key pad looks cool, but I guess, it would be a bit uncomfortable to use. You should need minimum effort to unlock your keypad.
On the surface, you will basically find a complete UI change. I haven't yet digged into the new APIs.
Have an Eclair !!!!! :)
Android 2.0 !!! Where is Google Maps
 Just saw Android 2.0 (Eclairs) and downloaded it. Started the emulator, and compiled my project with 2.0 settings. I was surprised to see red marks all over the place. After looking at the console, I figured out that Android 2.0 doesn't have in-built Maps API. If your application uses the Google Maps API, then you are in for a surprise. Read on.
Now what?
In the emulator too, I didn't find the Google Maps application. Damn. But, just to test if my other functionalities were intact with the new Android 2.0, I added the maps.jar avaialble in the Android SDK as an external jar.
I thought this would solve the problem. All compile errors vanished. But when I tried to install my app, the console said,
"Installation error: INSTALL_FAILED_MISSING_SHARED_LIBRARY"
To avoid this installation error, you have to remove this line from the manifest file so that Android detects the maps.jar as an external API and not an internal one.
Just saw Android 2.0 (Eclairs) and downloaded it. Started the emulator, and compiled my project with 2.0 settings. I was surprised to see red marks all over the place. After looking at the console, I figured out that Android 2.0 doesn't have in-built Maps API. If your application uses the Google Maps API, then you are in for a surprise. Read on.
Now what?
In the emulator too, I didn't find the Google Maps application. Damn. But, just to test if my other functionalities were intact with the new Android 2.0, I added the maps.jar avaialble in the Android SDK as an external jar.
I thought this would solve the problem. All compile errors vanished. But when I tried to install my app, the console said,
"Installation error: INSTALL_FAILED_MISSING_SHARED_LIBRARY"
To avoid this installation error, you have to remove this line from the manifest file so that Android detects the maps.jar as an external API and not an internal one.
Wednesday, October 21, 2009
Orientation independent applications
The Android phones detect orientation changes when you tilt your phone from landscape to portrait or vice-versa. It’s a cute feature. Well, most of the time you would be using your phone in the portrait mode. But for the phones that have a full QWERTY keyboard, the orientation automatically changes to landscape mode when you slide out your keyboard. If your application is not designed to handle such orientation changes, the usability of your application might decrease to an extent at which it might get completely unusable, or at the least, very inconvenient for the user.
How to handle it? It is actually very simple. You would have put all your layout xml files in a folder called “res/layout”. This is the default location from where the layout files are picked up, i.e , when your phone is in portrait mode. You just need to create one more folder “res/layout-land” where you put you xml files, with the same name, but with a different layout, which would be convenient for the user to view when in portrait mode. This is all you have to do.
Next time, when the orientation is changed, your layout files will be picked up from the layout-land folder, and will be applied to your UI.
Enjoy….
Monday, October 5, 2009
Gesture Detection on Android
I just got my gesture detection code working. It's a fun way and a convenient way as well to enhance the usability of your application. So, here is the code that gets you going. First, for the Activity that you want to detect gestures, the OnGestureListener interface has to be implemented. Then, you need to override the methods and implement them. And finally, you need to implement the onTouchEvent method of the activity that will trigger the gesture listener code.
1: package com.beanie.androidco;
2:
3: import android.app.Activity;
4: import android.os.Bundle;
5: import android.view.GestureDetector;
6: import android.view.MotionEvent;
7: import android.view.GestureDetector.OnGestureListener;
8:
9: public class GestureDemo extends Activity implements OnGestureListener {
10: private GestureDetector gestureDetector;
11: @Override
12: public void onCreate(Bundle savedInstanceState) {
13: super.onCreate(savedInstanceState);
14: setContentView(R.layout.main);
15: gestureDetector = new GestureDetector(this);
16: }
17:
18: @Override
19: public boolean onTouchEvent(MotionEvent event) {
20: return gestureDetector.onTouchEvent(event);
21: }
22:
23: @Override
24: public boolean onDown(MotionEvent e) {
25: // Do something
26: return false;
27: }
28:
29: @Override
30: public boolean onFling(MotionEvent e1, MotionEvent e2, float velocityX,
31: float velocityY) {
32: // Do something
33: return false;
34: }
35:
36: @Override
37: public void onLongPress(MotionEvent e) {
38: // Do something
39: }
40:
41: @Override
42: public boolean onScroll(MotionEvent e1, MotionEvent e2, float distanceX,
43: float distanceY) {
44: // Do something
45: return false;
46: }
47:
48: @Override
49: public void onShowPress(MotionEvent e) {
50: // Do something
51: }
52:
53: @Override
54: public boolean onSingleTapUp(MotionEvent e) {
55: // Do something
56: return false;
57: }
58: }
The most commonly used method would probably be the onFling method, where you have to check for a threshold velocity and displacement before you would want to trigger an action. For detecting Left Fling, Right Fling, Scroll down/up, you will need to write some extra code in the corresponding methods. Enjoy...
Monday, September 7, 2009
SMS Blocking in Android
 Recently, I tried to develop an app that would block sms from certain numbers that you can choose. It seems that you cannot completely block the incoming sms. These were the problems that I faced while working with this app.
1. There are no APIs supplied, that handles the SMS inbox (I mean, no content providersm which can be directly queried to fetch records from the sms table). However, you have a workaround of finding the tables where the sms is stored, and then querying and updating that table. Well, there is actually a content provider, that exposes this table to other applications, but it is not documented anywhere. So, I have to hardcode the column values. This is potentially dangerous, if in the next Donut release, Google changes the column names, my application would fall apart.
2. On receiving of an SMS, I have 2 things to do. Remove the SMS from the sms table, and disable the notification. Deleting the sms from the table was pretty easy, but I couldn't find a way to remove the Notification. Perhaps, there is no way that we can disable this notification. One workaround might be, to temporarily change the Notification settings, the moment you sense an incoming message from a blocked number. And, after you delete the message from the sms table, you just turn on the notification. I haven't worked on this, but this might just work.
3. If the Messaging application is already open, and an sms arrives, weird things start to happen. I can see the blocked sms being deleted, and the list of sms gets updated. But the next message in the list is marked as "Unread". Probably, this is done by the Notification, I don't know.
4. SMS broadcast, is definitely, an un-ordered one. So, the easiest way, that could have worked, would have been just to abort the broadcast. But in this case, you don't have this option. so, once you recieve this broadcast, you have to manually go and delete the message, by matching the incoming number, timestamp etc. Timestamp method isn't foolproof. Because, the timestamp you receive, is the timestamp of the broadcast, and not the time when the sms is written into the DB. So they wont match. You should pick up the incoming number, and check for the timestamp within a range of about 1 seconds. This should give you the sms that you need to delete.
5. There's another problem. When you recieve the broadcast, the system wont write the sms into the table, before it is sure that all the broadcast receivers have done their work. So, it waits for some time, and then writes the sms into the table. Before this, if you try to delete the sms, obviously, you would not find it in the table. So, make your code sleep for about a second, and then go and delete the SMS. That should do it. But, the most important problem still persists. THE NOTIFICATION. I guess, it can't be removed.
Saturday, August 22, 2009
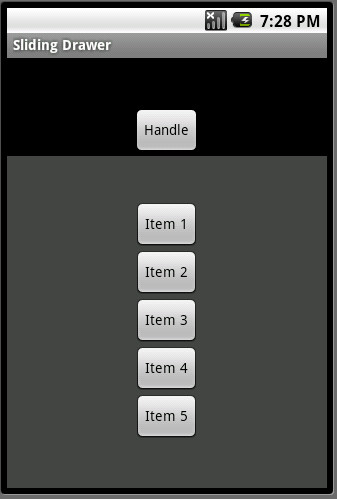
Android : Sliding Drawer Example
If you have lot’s of stuff to put on your screen for a single activity, you should probably go for the SlidingDrawer widget. It is very simple to use, and looks cute. Here are the steps that you need to do for bringing up the sliding drawer on your activity.
Here is a sample application displaying how to code up a sliding drawer. It's pretty simple, and I don't think it needs more explanation.


The sample project sets up a Sliding Drawer at the bottom of the screen. You can change it to appear at place of the screen. You just need to change/adjust some properties of the SlidingDrawer.
Here is a sample application displaying how to code up a sliding drawer. It's pretty simple, and I don't think it needs more explanation.

<SlidingDrawer android:id="@+id/slidingDrawer1"
android:layout_width="fill_parent" android:layout_height="fill_parent"
android:topOffset="50dip" android:handle="@+id/handle"
android:content="@+id/content">
The sample project sets up a Sliding Drawer at the bottom of the screen. You can change it to appear at place of the screen. You just need to change/adjust some properties of the SlidingDrawer.
- The orientation property can be set to either "horizontal" and "vertical"
- There are properties like "topOffset", "bottonOffset", "rightOffset" and "leftOffset" with which you can position your drawer anywhere.
- With a few more changes, you can attach backgrounds/images to the whole SlidingDrawer. For example, I have added a color background to the content of the Sliding Drawer.
Thursday, August 13, 2009
FileWriter in Android
This is a pretty handy API that you can use to write a string of information to a file on the device. It doesn’t need a StreamWriter or BufferedWriter or FileOutputStream. It is short and sweet.
FileWriter fWriter;
try{
fWriter = new FileWriter(“\sdcard\filename.txt”);
fWriter.write(yourString);
fWriter.flush();
fWriter.close();
}catch(Exception e){
e.printStackTrace();
}
The flush() and close() calls are important here, and also make sure that the “sdcard” is mounted. Else, you can use a path such as “data\data\com\yourpackage\filename.txt” which would create a file in the data directory of your package.
Scrollview in Android
I never noticed, or realised how an application’s UI would render when the orientation changed, since most of the time I tested my apps on the emulator. But one fine day, when a friend of mine walked in and asked to change the orientation, I shocked to see that the layouts didn’t fit in the landscape view.
Well, the solution!!!
Wrap your layouts in a parent ScrollView, so that, when the orientation changes, you will be able to at-least scroll and view the whole layout. How the UI looks, is however a different concern.
Well, the solution!!!
Wrap your layouts in a parent ScrollView, so that, when the orientation changes, you will be able to at-least scroll and view the whole layout. How the UI looks, is however a different concern.
Relative Layouts vs Linear Layouts
From the very first day, I hated Relative Layouts. I struggled with layouts in general during my initial days till I figured out that Linear Layouts can create any kind of complex layout you need. By using only the Linear Layouts, you can create whatever you want. I had always wondered what was the purpose of the other available layouts.
I was a fan of the Linear Layouts till the day I hit the dead end. With SDK 1.5, pressing for the limit up to which your view hierarchy can be deep, problems started with my existing apps. I was able to remove the errors by removing a layout or two. And then, there was a case, where, I couldn’t remove a level. I was hitting the StackOverflow exception all the time. Frustrated, I posted my query to Google Groups, and guess what, Romain Guy responded, asking me to remove or simplify my view hierarchy. Well, if I were to listen to him, it would mean converting some Linear Layouts to Relative Layouts. And since I didn’t understand Relative Layouts then, I though it was a big big ask. But I tried, and guess what, now my UI is faster, simpler and I don’t get that StackOverflow exception.
I have now realized that though it is easy to use LinearLayouts, but RelativeLayouts not only make your UI load faster, but also is easier to render (at least for me). I have changed all my Linear Layouts to Relative ones, wherever possible.
I also watched the Google I/O videos that gave me a lot of information regarding how to code for Android platform. One of them I would like to mention in my next blog would be about the ListView, the most widely used widget, and i guess, the most wrongly used as well.
Keep droiding….
Sunday, July 12, 2009
A Custom ListView for Android
I have been thinking about starting a new blog for Android stuff for quite a long time. And today, I found some time for the same. So here goes my first post. This is about developing your own custom list view. The List View is a very powerful UI element for the android platform. And it provides a lot of customizing features as well. Let’s jump into the details right away.
For this example, I will be using an example for a phone book entry, with the contacts having basic information like “name”, “phone” and “email”.
Step 1: Lets create a POJO class for the phone book.
Class name : Phonebook.java
Not a complex code. Just the three fields, a constructor and the getters and setters. That’s it.
Step 2: Lets create the layout that each row of the List View is going to look like. I prefer to do this layout in xml rather than through coding/programmatically. xml stuff is pretty easy to develop.
File name : phone_row.xml
This layout has three Text Views, tvContact, tvMobile and tvMail which we will be using in our code. We don’t need to touch any other elements from this file, if you should have to edit this xml, do it carefully.
Step 3: Now, lets create a class which our custom adapter will be calling to render each row of the List View. Here, we need the layout file created in Step 2. This class should extend any layout type, e.g, LinearLayout, TableLayout, etc. In my example, I am using a LinearLayout.
Class name : PhonebookAdapterView.java
In this class, create a constructor with two parameters, Context and the Pojo class Phonebook. And, inside the constructor, set the fields to the text views. The “this.setTag(entry)” will enable us to get info on the phonebook entry, when we use the listener for List View.
Update: I have deleted this class from the example, and have used the efficient way recommended for ListView. Checkout out the code.
Step 4: Now, create the Phonebook adapter class which extends the BaseAdapter. This will be used to set a list of Phonebook items to the list view with our customized layout.
Class name : PhonebookAdapter.java
This class has a bit of coding, and changes to be made in the default methods that comes in when you extend the BaseAdapter class, however it is simple enough. A new constructor and two new private members is all that you have to include.
 Override the methods as given in the code. The method getView is the important one. Here, we call our PhonebookAdapterView class.
Now, you are done. Your custom list view has been created. The final step would be testing the custom list view. Just create and activity with a listview. Then create an instance of the PhonebookAdapter class passing the parameters (Context and list of Phonebook objects)
Then, set this adapter to the list view. You are done. Here is the output.
Here is the link where you can find all the source code as an Android Project (1.5 compatible).
Full source code is here.
Update: I have updated the example, to include a button on each line item, which when clicked, removes that item from the List View.
Subscribe to:
Posts (Atom)